BIG GREEN EGG SMOKED CHICKEN
 PRINT RECIPE
I was about ready to give up on cooking chicken until I discovered the magic of smoking chicken in the Big Green Egg! I can’t say enough great things about smoking food in the Egg, but you really have to either find a friend willing to share the meat, or throw caution to the wind, take a leap of faith, and just buy one. A client once said to me, “It will change your life.” The Egg has absolutely made my life better.
Whole chicken, especially the breast meat, is exceptionally awesome when cooked in the Big Green Egg. The chicken is extremely moist and the flavor combo from the dry rub and the mesquite is superb. You will need 24 hours to soak the birds in the brine, the next night to air-dry the chickens in the fridge, and finally, 3 hours prior to smoking to flavor the bird with the dry rub.
INGREDIENTS
Set 1
2 whole chickens
¼ c. brown sugar
¼ c. salt
1 gallon of drinking water
Set 2
PaulaQ’s dry rub for smoking
Set 3
1 lemon
1 apple
Half of a yellow onion
Sprigs of fresh thyme
Apple juice or water
Set 4
Large-chunk mesquite wood
Lump charcoal
Set 5
PaulaQ’s recipe for bbq sauce or your favorite bbq dipping sauce
Tools: 2-gallon food-safe container with cover that fits in the fridge, 4-cup measuring pitcher, large baking dish measuring about 11 x 17 or two 17 x 12ish x 3ish disposable roasting pans, ceramic chicken stands for smoking, drip pan, heavy-duty foil, paper towels or napkins, BBQ Guru WiFi Temp Controller with fan/blower, heat-proof, food-safe bbq gloves, your smoking tools
DIRECTIONS
Prep
1. Rinse both chickens and place them breast side down in the large container that can fit in the fridge.
2. Pour the salt into the measuring pitcher then add water to the 4-cup line. Stir the salt to dissolve most of it. Pour this solution into the container with the chicken.
3. Add more water to the pitcher then stir again to dissolve the salt. Pour the solution into the container with the chicken.
4. Repeat steps 3 and 4 with the brown sugar for a total of 1 gallon or 16 cups of water. This should be enough to cover most of the chicken.
5. Soak the chicken in the fridge for 24 hours.
Air Dry in Fridge
6. After 24 hours, it’s time to dry the bird. Carefully crumble up two sheets of aluminum foil per bird then place the foil in the large pan or in the disposable roasting pan. The crumbled foil sheets will be the bed that each chicken lays on to dry out.
7. Remove each chicken from the brine and rinse under cold running water. Drip dry then place on the foil beds. Pat dry with paper towels or napkins. Keep in fridge overnight or about 8 hours.
Day-of Prep
8. Remove birds from the fridge. Run one hand between the meat and the skin to separate the skin from most of the chicken. Do this across the breast, thighs, drumsticks, drumettes, and the thigh portion on the backside of the bird.
9. Grab some rub and apply a light coating of the rub underneath the skin, over as much area as possible.
10. Smear rub in the cavity.
11. Apply a light coating of rub all over the exterior of the skin. The rub may be applied the night before once you have patted the chicken dry.
12. Place the chicken back in the fridge until ready to smoke.
13. Cube the apple and remove the seeds. Cube the lemon and onions. Divide the cubed aromatics and place equal amounts in each of the ceramic chicken stands. Pour water or apple juice into the stands and set aside till ready to smoke.
Smoke It Baby
14. Prepare your Egg for smoking. We use a BBQ Guru WiFi temp controller with fan/blower to make monitoring the chicken so much more easy.
15. Take the chicken out of the fridge and insert a temperature probe into one breast of each chicken.
16. Position the plate setter with its feet up. One foot should be against the very back part of the egg.
17. Put a drip pan with about 4 cups of water into the plate setter – if you want to use a drip/water pan. One day I’ll be risky enough to forgo the water pan….I’ll let you know how it goes!
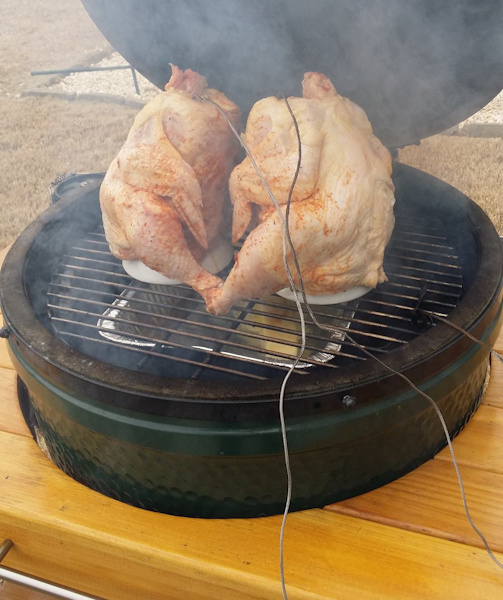
18. Place the ceramic stands on the grill first then sit the chicken on the stands. MAKE A NOTE of which chicken has probe 1 and which has probe 2. I’ve noticed that sometimes the temp on one side of the egg is different from the temp on the other side. Hook the other end of the probe to the WiFi console. Set up the WiFi as directed in the instructions.
19. OVEN TEMP: 250 degrees F.
20. BREAST TEMP: 167 to 170 degrees F.
21. Depending on the outside temperature, it could take 2 hours 15 minutes to almost 4 hours to smoke two chickens on the ceramic stand…..even with the oven temp set at 250 degrees F. Outdoor temps appear to make a difference. The Egg stays closed until we see that the breast registers between 167 to 170 degrees.
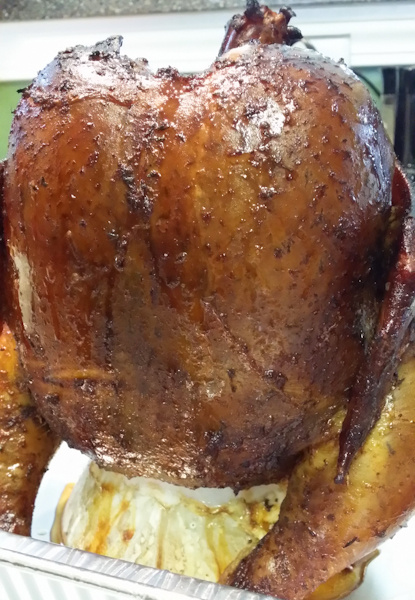
22. Once done, place one chicken in its own disposable roasting pan. Cover the pan with a sheet of heavy-duty foil and crease the foil to the edges of the pan to seal the heat in. Place in a cooler for at least an hour. It will still be quite hot when you take it out, even after 3 hours.
23. If you are not going to eat one of the birds, take it out of the cooler after a couple of hours and cool somewhat on the counter. LEAVE IT WRAPPED. Place in the fridge over night. In my opinion, this second chicken is more moist and tasty than the one cut up and eaten the day it’s cooked.
NOTE: I love to carve the chicken by first removing the legs, wings, and thighs. Remove the entire breast on each side from the rib bones. Finally, slice across the breast, creating short, ¼-inch thick slices of breast meat. These make excellent chicken sandwiches. Use leftover dark and light meat smoked chicken to make awesome quesadillas with bbq sauce for dipping instead of salsa.
BRINING
Brining is simply soaking a protein – chicken in this case – in a solution of some type of salt, sugar, and perhaps flavorings. I’m a firm believer in brining my chicken before cooking it – baking, smoking, bbqing – you name it! The brine helps keep the chicken moist and tender – and it draws out some of the residual blood too. For smoking in the Egg, I’ve used brine that’s been boiled to dissolve all of the salt and sugar, and I’ve used brine that was not boiled. I’m sticking to the UNBOILED brine since I tend to soak my chicken for 24 hours. The boiled brine rendered my birds too salty after 12 hours. Of course, the boiled brine did have more salt and was only supposed to brine for 8 hours.
DRYING and SEASONING
I do drain the chicken then let it air dry in the fridge overnight. Depending on my schedule, I may rub the chicken at night if I don’t have time in the morning. Otherwise, I apply a light rub under the skin and over the skin, all over the chicken, about 3 hours prior to smoking.
SMOKING WOOD
My husband and I love using mesquite with chicken. The smoke is strong without being bitter since the birds cook in 2 to 4 hours. We’ve used apple wood too, but we really love the mesquite.
WATER PAN
Do you need the water pan in the egg? One camp says yes, the other no. Since the bossman and I have never smoked chicken without a water pan, we’re just going to keep using it. Besides, we have to keep a pan in there to catch the drippings anyways – to keep the plate setter clean and keep the drippings from burning. We’ve loved the results so far.
UPRIGHT or HORIZONTAL
We’ve smoked chickens both on their backs and on a vertical ceramic stand. Chickens smoked on the ceramic stand cooked faster than chickens cooked on their backs on the grill – of course. I do stuff cubes of Fiji apples, yellow onions, and lemon in each stand along with a few sprigs of fresh thyme. I also pour water or apple juice into the stand. Is all this stuff in the stand necessary other than for aromatics? I really don’t know, but whatever it does or doesn’t do, we love the end result so I’m going to stick with it.
OUTDOOR TEMPERATURE
In the cold temps of the 20s and 30s, chicken takes longer to cook compared to temps in the 50s and warmer – just an FYI for scheduling purposes. On the other hand, I’ve noticed that chicken wrapped in foil for several hours after smoking is so much moister – yes, it’s possible – than the chicken that’s wrapped in foil for 1 hour.
OVEN TEMPERATURE
We’ve smoked chicken at 275 degrees F. and 250 degrees F. We prefer smoking at 250 degrees.
MEAT TEMPERATURE
So far, we’ve only needed to cook two birds at a time. We have used the temperature probes in the breast of one chicken and the thigh of the other. However, we now stick to just a probe in one breast of each chicken. We take the chickens out when the breast reaches 167 to 170 degrees – depending on how starving we are!
FOOD-SAFE, FOOD PREP AND HEAT-PROOF BBQ GLOVES
Barbeque gloves are especially valuable if you are smoking the chicken by yourself. To keep your hands clean while setting the raw chicken on the stands, use a pair of food-prep gloves first then put on the heat-proof gloves. Once you’ve set the chicken on the stands, remove the heat-proof gloves then remove the food-prep gloves. Your hands are now clean to do what you need to do. The heat-proof gloves are especially useful in removing the cooked chicken and stands from the Egg. It gets cumbersome removing chicken any other way.
FOIL WRAP
Once we take the chicken out of the Egg, we place it on its back in a disposal roasting pan. We cover it with a sheet of heavy-duty foil and place it in a cooler. Crimp the foil along the edge of the pan to seal tightly. We eat one chicken in 30 to 60 minutes. The other chicken stays wrapped in the foil in the cooler for a few hours. I take it out and keep on the counter for another hour before it goes into the fridge, still wrapped and never opened. OMG, once I cut into this chicken after 1 or 2 days in the fridge, it is better than the first bird!
 Next Recipe
 Return to Big Green Egg