Because I wanted to write this macaron recipe as a stand-alone recipe, I did replicate a few key sections from the body of the macaron book, Macarons Math, Science, and Art.
Makes 112 discs, or 56 filled macaron cookies
Modern macaron—ma-ka-rohn—cookies, not to be confused with coconut macaroon, are basically two discs of nutty meringue that sandwich a sweet filling. A meringue is basically egg whites whipped with sugar. French meringue, also called basic meringue, is the easiest though most delicate style of making meringue; it blends sugar into room temperature egg whites. This recipe uses the French meringue method for making macarons.
There are many tools you will need for this recipe. The most important are the kitchen scale and the oven thermometer. My electric scale happens to measure in grams and ounces. However, the gram measurement is in multiples of 2 grams, while the ounce measurement reads into the tenth place. Using ounces, I can get a little more exact. I check the accuracy of my scale using a 1-pound box of powdered sugar. After owning it for more than 12 years, I’m thrilled it’s still working perfectly!
The heat in the oven sets the structure of the meringue and gives the macarons their characteristic feet. The amount of heat and the rate of heat application are vital for perfect macarons, and they can potentially be the most unstable aspect of making macarons. Without a convection oven, you must create an extremely stable meringue and quickly apply as much constant heat to your cookies as you can without burning them. The heat creates the feet and holds the meringue in place so the macarons don’t become hollow. I have an electric oven without a convection feature.
I use a 4.5 quart Kitchen Aid stand mixer; the mixing time below refers to this specific machine. You can certainly use another brand or even a hand beater, but be sure to beat the meringue until it is stiff. If your mixer is very old or very new, the settings could run slightly slower or faster than my Kitchen Aid.
Do your prep work two days before you will make the macaron discs. All measurements are in weight, not in volume, including the egg whites.
The video demonstrates that these cookies are not so difficult to make, and they are less time-consuming compared to making guyuria, a Guam cookie. My recipe was inspired by pastry chef Martin Brunner of The Bakehouse in Aberdeen, North Carolina.
I have to tell you how much I appreciate all of the fraction, decimal, and percentage exercises that I had to do in my math classes as I was creating this recipe. Kudos to all my math teachers!
I’ve written these directions with as much detail as possible for this specific recipe using my electric oven and an old Kitchen Aid mixer. Though my recipe is quite detailed, delicious and beautiful macs also depend on your specific oven. You may have to make this recipe two or three times simply to get the macs perfect in your very own oven.
INGREDIENTS
Set 1
6.0 to 6.3 ounces egg whites*
You will ultimately use only 4 ounces of three-day old whites (4 oz. = 113.40 g / 6.0 oz. = 170.10 g / 6.3 oz = 178.60 g).
*If aging the eggs for five days, you’ll need 6.8 ounces, or 192.78 grams, of whites to start with.
Set 2
5 ounces almond flour/meal (141.75 grams)
8 ounces powdered sugar (226.80 grams)
Set 3
1.5 ounces caster sugar (42.52 grams)
0.5 ounces tapioca starch (14.18 grams)
¼ teaspoon cream of tartar
Set 4
½ teaspoon powdered food coloring or 4 to 5 drops gel coloring
Day 1
Egg Whites: 6 to 6.3 ounces of egg whites, the whites from six large eggs (if aging for five days, start with about 6.8 ounces)
Tools: two cereal bowls, kitchen scale
Use the uncracked eggs that you have had on your counter or in your fridge for a couple of days.
Turn your scale on if it’s electrical. Place one bowl on the scale then tare the scale or set it to zero.
Separate one egg over one bowl. If you did not break the yolk, pour the single egg white into the bowl on the scale; if you broke the yolk, save the egg for scrambled eggs. Wash and dry your bowl then start all over. Repeat this process until you have measured about 6 ounces of egg whites.
Leave the bowl of whites at room temperature—about 72 degrees Fahrenheit—uncovered, for three days on your counter. If there are bugs flying around, cover the entire container with a sheet of cheesecloth.
It’s best to use store-bought almond flour if this is your first time. Simply measure out 5 ounces of store-bought almond flour into a container with a cover. Cover the flour and set aside until ready to use.
If you do not have store-bought almond flour, here is how you can grind your own. I have not tried drying my flour to date.
Tools: coffee grinder, fine-mesh strainer, medium bowl, adult dinner spoon, kitchen scale, 2-cup container with cover
Note on the strainer: The holes of the strainer must be tiny. The holes should measure less 1/16 of an inch. A small thumbtack would not be able to fit through the hole. This is essential otherwise you end up with very bumpy surfaces on your baked macarons.
Place the 2-cup container on the scale then set the scale to zero.
Grab a handful of blanched, slivered almonds and place the nuts into a clean coffee grinder that you use just for spices or nuts. Grind at the fine setting for 5 to 8 seconds, shaking the coffee grinder to shake up the nuts as they grind. If you grind too long, the nuts will turn into nut butter. You can sift a piece or two of caked up nut butter, but not the entire batch.
Pour the ground nuts into a fine-mesh strainer set atop a medium bowl. Use the adult dinner spoon to push-and-stir the nuts through the mesh. The small pieces will go through easily while some pieces may take a bit of effort.
Spoon the “large” pieces back into the grinder.
Pour the finely sieved nuts into the 2-cup container on the scale.
Add another handful of nuts to the coffee grinder and repeat the entire process until you have measured 6 ounces of finely ground almonds.
Leave the flour uncovered in your kitchen until it’s ready to use in a few days.
If the flour still looks moist or wet, you will have to dry it in your oven at 200 degrees Fahrenheit for 30 minutes.
Note: I have yet to dry my flour in the oven, but according to foodnouveau.com, the oven works well for dying almond flour.
Sugars: 1.5 ounces caster sugar, and 8 ounces powdered sugar
Tools: 1-cup container with cover, 2-cup container with cover
Since you have your scale out, measure the caster sugar into the 1-cup container as described above. Do the same for the powdered sugar using the 2-cup container. Cover the containers and set aside.
Note: The crystal sizes of caster sugar are absolutely much smaller than even the superfine table sugar many grocers carry. Some folks place table sugar into a blender and process the sugar into smaller particles. If you are unable to get caster sugar, this can be done as an alternative.
Prepare Your Parchment Patterns
Tools: 5 high-quality or professional half-sheet pans, 1 to 5 silicone mats, parchment paper, circle patterns, pencil, clean cooling racks, kitchen towels, Microsoft Word or other word processor, printer
Wash your silicone mats in warm water using a soft sponge. Dry thoroughly with a kitchen towel and place on clean cooling racks to dry completely.
If you are not adept at manually piping even circles of batter, use a pattern:
Open a blank Word document then insert a circle. You’ll have to adjust the size, print the document, and then readjust the size of the circle back on your computer until you get a circle that measures about 1 1/16 to 1 1/8 of an inch in diameter. A diameter is the distance across opposite sides of a circle, running through the middle.
Copy and paste the circle so you end up with three circles in a horizontal line, as straight as possible; space them evenly. Select two circles then copy and paste them below the first row. Stagger the row of two circles such that the circles are between the three circles above.
Copy and paste the rows so you end up with five, alternating, staggered rows of circles. Print one sheet.
Lay the sheet on the baking pan then put a piece of parchment over them, wrong side up. Align the left sides of the pattern and the parchment together if you are a right-handed person; align the right sides if you are a lefty. Instead of tracing each circle in its entirety, mark only the top, bottom, and side borders of each circle with a dash. When you pipe the batter with your bag perpendicular to the parchment, the batter will spread in a circle; stop when you hit the marked borders.
Begin your tracings from left to right if you are a righty so you don’t smear pencil markings all over the place; work right to left if you are a lefty. Set aside until day four.
Note: I tear out sheets of parchment from my roll and lay them flat for several weeks so they are ready to use as needed.
Prep the Piping Bags
Tools: two 12-inch cake decorating or piping bags, 2 sets of couplers, #12 Wilton round tip or a tip that measures 5/16 of an inch in diameter, #10 Wilton round tip or a tip that measures 3/16 to ¼ of an inch in diameter, plastic wrap
Cut a small piece off the tip of one piping bag so that when you place the long part of the coupler—called the base—narrow end in first, the edge lines up with the cut-end of the bag; the coupler can be slightly shy of the opening.
Place the #12 tip over the base then attach the ring to secure the tip in place. This bag will be used to pipe the macaron batter.
Repeat for tip #10; this will be used for the filling. Set aside.
Days 2 and 3 (days 4 and 5 as well if aging eggs for five days)
Do nothing.
Day 4 (or Day 6 if aging whites for five days)
Clean the Meringue Tools
Tools: stand mixer with bowl and whisk attachment, 4-cup measuring pitcher, small plate, rubber spatula, clean kitchen towels or paper towels
Boil 4 cups of water in the microwave using a measuring pitcher.
Set the mixer bowl on the counter. Hold the whisk over the mixing bowl in one hand as you pour some of the boiling water over the whisk. Dry the whisk thoroughly then attach to the mixer.
Repeat with the small plate. Dry thoroughly.
Clean the spatula with boiling water, again over the mixing bowl. Dry and set the spatula on the clean plate.
Carefully whirl the hot water around the entire inner surface of the mixing bowl. Dry thoroughly. The tools will cool off while you work on the next step.
Note: After so many trials, I stopped doing all this because I was using the tools just for the meringue! I ensured that after I used soapy water to clean the meringue-dirtied tools, I rinsed them in very hot water. If you use the same bowls and beaters to make anything with butter, Crisco, or oil, do this cleaning step every time.
Prepare Your Baking Pans
Tools: 5 high-quality or professional half-sheet pans, 1 to 5 silicone mats and/or prepared parchment paper, non-stick spray if using parchment
If using parchment, spray the pan with non-stick spray.
Turn the parchment right side up. Carefully apply the parchment paper to the prepared pan as if applying tint to a window or wallpaper to a wall.
If using silicone mats, lay the mats flat on your pans.
Mix Almond Flour with Powdered Sugar
Tools: large food processor, fine-mesh strainer, medium bowl, large stainless-steel mixing bowl, adult dinner spoon
Pour the almond flour that you sifted yesterday into the bowl of the food processor.
Add the powdered sugar to the same bowl.
Cover the bowl and give it a couple of pulses. Uncover and use the spoon to scrape any unmixed parts at the bottom and edges of the food processor bowls.
Give it a few more whirls. Uncover and remove the bowl from the food processor. Move the processor out of your way.
Situate the strainer atop the medium bowl. Spoon some of the almond flour-powdered sugar mixture into the strainer. Use the spoon to sift the mixture.
Repeat until you have sieved it all. Carefully pour the dry mixture into the large stainless steel bowl.
Reserve a ½ cup of the almond flour and powdered sugar mixture. Do this by taking an adult dinner spoon and pouring the mixture over the ½-cup measuring cup. Use a straight edge knife to flatten the surface of the mixture in the cup. Set aside.
Note: I have never needed to use all of the dry ingredients in this recipe. Once I am done piping the batter, I pour this dry mix into a separate container. When I have 13 ounces of proportionately correct flour and sugar, I will try using it in this same recipe—in lieu of measuring out the almond flour and powdered sugar again. I’ll post updates on this particular trial to my website.
Set your baking pans and piping bags up in the area that you are going to pipe your macaron batter.
Place one oven rack at the lowest level of your oven. Set the baking stone on the rack. Place your oven thermometer on the same rack, to the front and left corner, where you can read it easily with the oven door closed and the oven light turned on. It should not be in the way when you insert and remove your baking pans.
Keep your oven light turned on. Set the heat dial of your oven to 250 degrees Fahrenheit and allow to preheat as you make your batter, keeping the oven door slightly ajar to dry the air in your kitchen.
Reweigh the Egg Whites
Use your scale and a clean bowl to measure out exactly 4 ounces of egg whites from the egg whites that you have been aging. Leave the scale out for the next step below.
Make the French Meringue
Tools: cleaned stand mixer tools
Place your container of caster sugar on the scale and tare it to zero. Add 0.5 ounces of tapioca starch to the sugar. Add ¼ teaspoon of cream of tartar to the sugar. Stir to combine thoroughly. Put your scale away.
Pour the egg whites and the sugar mixture into the bowl of your mixer; use a clean spatula or clean fingers to scrape as much of the whites as you can into the mixer bowl. Use the mixer’s beater to somewhat stir the dry ingredients by hand into the egg whites for only 3 seconds; this reduces the amount of powder that mists into the air once you turn the mixer on. Attach the beater to the mixer and secure the mixer bowl; lock the mixer in place.
Beat the egg whites and sugar at medium speed for 6 minutes; medium is number 4 for the Kitchen Aid. I use my microwave’s digital timer. At the end of 6 total minutes of whipping at level 4, you will have a very soft-peaked meringue.
Turn the speed to medium-high—that’s number 5 on the Kitchen Aid. Beat for 9 minutes. At the end of this stage, you will have a stiff meringue at the early stage of stiff peaks. Stop the mixer and remove the beater. Dip the beater into the meringue, and note how it feels.
Add a ½ teaspoon of powdered food coloring or 4 drops of gel coloring; incorporate the color somewhat using the beater.
Attach the beater and turn the speed to high; that’s number 6 on the Kitchen Aid. Beat for 1 minute.
Macaronage
Tools: cleaned rubber spatula, 2 small spoons, small bowl, kitchen towel, ½-cup measuring cup, straight-edge knife or cake decorating spatula
Unlock your mixer and remove the bowl. Detach the whisk and shake the meringue back into the mixer bowl. Set the mixer aside and out of your way.
Scoop half of the meringue out of the whipping bowl and thoroughly incorporate it into the dry mixture; do this by folding the batter onto itself and pressing the batter against the sides and bottom of the bowl; it’s not a matter of being gentle or rough, just being thorough. Once the mixtures are well mixed, lift some batter up with the spatula then let it fall back into the bowl. Look at your batter closely; it will look pretty thick. Add a small portion of the remaining meringue. Incorporate well again. Look at your batter; it should look thinner, with the ribbons slowly blending into the surrounding batter. Add the last of the meringue and tenderly fold it in—now is the time to be gentle. Incorporate thoroughly. Test the batter by scooping a small amount of batter out of the bowl with a small cereal spoon. Ladle the batter into a mound in a plastic bowl, trailing the batter on the top to mimic the point of a piped macaron. Tap the plate on the counter. If the tip disappears, your batter is ready. If not, return the batter to the bowl and fold 10 more strokes. Test again.
Once your batter is ready, lay a sheet of plastic wrap out on the counter next to you. Use your spatula to scoop batter onto the sheet at a diagonal; the ends of the mound of batter should point to opposite ends of the plastic wrap. Fold the lower half of the plastic over the mound of batter and smooth it over the mound. Twist the ends and tuck the ends under the mound. Repeat with remaining batter, making three wrapped mounds.
Note: The batter will spread a little bit as you do this; that’s okay. Fold the lower half of the batter onto the upper half of the batter when you fold the plastic wrap; it’s like folding a tortilla to make a soft taco.
Pipe Your Batter
Clip one end of a wrapped mound of batter. Squeeze a bit of batter to the open end and insert this end into the prepared piping bag. Shake the bag to shimmy the wrapped batter to the piping end.
Twist the piping bag to hold the bag comfortably in your hand and to keep the batter in place.
Pipe your batter onto your prepared parchment patterns or on the silicone mats. Keep the piping tip about one-eighth of an inch from the pan; this will pop some of the bubbles as you squeeze the batter out.
If you are using silicone mats or didn’t make a pattern on the parchment papers, try this technique to pipe even circles:
Say aloud for every circle, “One, two, three.” Lift the tip up immediately after “three” and hover just above the mound for 1 second then quickly move over about 1 ½ to 2 inches and repeat, “One, two, three,” lift, hover, and move over. Repeat to fill up the pan. Apply even pressure on the bag for all the circles. Let the trailing tip of icing fall onto the circle you just finished piping then quickly move over to make the next circle. The batter is thin so it will start to ooze out of the tip as soon as you finish piping. However, it’s thick enough so that you have enough time to quickly move on.
Tap Your Pan
Tools: toothpicks, small fan
Once you have piped all your circles, set the piping bag aside, ensuring the tip is higher than the rest of the bag.
Hold on to each short side of the pan then gently hit the pan against the counter 8 times to bring the air bubbles to the top. Quickly prick the bubbles with a clean, sharp toothpick. Go back over the piped batter and prick the bubbles again; it should not take you more than 1 minute to pop the bubbles. More bubbles will come up, but leave them alone after 1 minute. If you wait too long to pop the bubbles, or if you try to pop all the bubbles that come up, the crust will start to form and the pricks will show on your finished, baked macs.
Set this pan aside and let it dry for 50 to 60 minutes. Position a small, desktop fan across from your trays such that there is a gentle breeze wafting across the piped batter. The goal of drying really is to allow the batter to form a dry, hard crust. The duration depends on the humidity in your kitchen. Use the first pan as your gauge. Once the macs on the first pan have crusted, start baking.
Repeat the piping, tapping, popping, and drying for the remaining pans.
Bake ’em up
Tools: several cooling racks, two extra AND exact baking pans, wooden rice scooper spoon
While your macs are drying, check the temperature in your oven. Though you may have set the oven’s dial to 310 degrees Fahrenheit, the temperature at the location of your thermometer may be different. Just make a note so you know how your oven is behaving. If you are using parchment paper instead of silicone macs, you need to reduce the oven temperature to about 300 or 305 degrees Fahrenheit and see what happens; macs cook too quickly on parchment paper at the higher temperature! At too high of a heat the feet will ooze out.
Nest one tray of macs into another tray of the exact same size. Place these nested trays on top of the baking stone and push the trays into the oven until they are about 3 inches from the back wall. Close the oven’s door and shimmy a thin spoon, like a rice cooker spoon, between the door and the oven, about 1/3 of the way down the side; this aids in setting and drying the tops of the macs. You should be able to see a ¼-inch crack of space at the side of the oven. Bake for 16 minutes.
Open the oven door and push on the top of one of the macarons. If it does not move, the cookies are done. If it moves, bake for another minute then check for doneness again.
Remove the pan from the oven and place on a cooling rack. Cool completely then remove the macaron discs.
As you continue to bake, opening and closing the oven door, the temperature will fluctuate a bit. Set your timer for 2 minutes every time you take out a try. This gives your oven some time to correct its temperature. Be sure to check your temperature, waiting if necessary for it to get close to its own inside, “normal” temperature … whatever it is when you set the oven’s dial to 315 degrees Fahrenheit.
The macs may seem hard and crunchy by the time they are cooled, but they will soften and become chewy 12 to 48 hours after they have been filled.
Note: Unfortunately, my electric oven may behave differently from your oven. You may have to slightly increase the temperature on the oven’s dial if your macarons seem like they are not cooked within 16 to 18 minutes. If the macs are browning too much, place a foil shield under the upper element and see how it affects the macs. I found that in my oven, using a foil shield prevented the top of the macs from setting properly.
Maturing and Storing
Tools: several air-tight containers
Okay. Go right ahead and enjoy a couple of macaron discs. They are probably crunchy and hard; some might be soft and chewy. Regardless of whether you like them or not, they will taste better the next day after they have had time to soak up some of the moisture from the filling.
Unfilled
Arrange the unfilled discs in a single layer in freezer-gallon bags. Fill several bags and gently stack them in a covered container for up to five days. By the fourth day, you should place the container in the freezer to keep for several months.
Filled
They must be filled and matured to transform into the soft, chewy, sweet-filled cookies you know as French macarons. Here’s the deal. If you use a hard filling—filling that stays quite firm at room temperature—then you can fill the macs today and store them in the fridge; they will be ready to eat in 48 to 72 hours. However, if you use a soft filling, the macarons may be filled and kept in the fridge less, ready in 12 to 24 hours. Maturation is something you will have to experiment with depending on how thick your discs and fillings are, and how much moisture is in each type of filling.
Arrange your macaron discs in pairs of the same size and shape. Flip the bottom disc of the pair upside-down.
Clip one end of a wrapped mound of filling. Squeeze a bit of filling to the open end and insert this end into the prepared piping bag. Shake the bag to shimmy the wrapped filling to the piping end.
Twist the piping bag to hold the bag comfortably in your hand and to keep the filling in place.
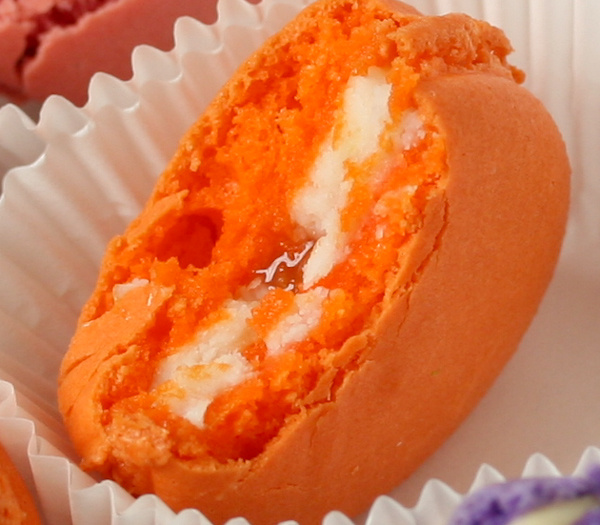
Pipe enough filling onto the center of the flipped discs so that when you sandwich the filling, it’s just under ¼-inch thick.
Note: I’ve discovered that fillings like lemon curd and jam are best at about a 1/8-inch thickness while cream cheese fillings are excellent closer to ¼-inch thick.
Hard Fillings
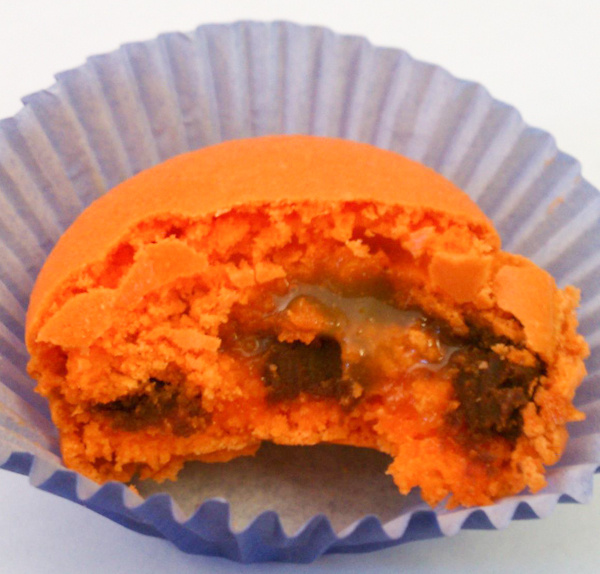
Dark Chocolate Ganache, Coconut optional
This recipe was adapted from davidlebovitz.com.
INGREDIENTS
Set 1
½ cup heavy cream
2 teaspoons light corn syrup or honey
Set 2
4 ounces Dove dark chocolate (or 15 square pieces)
¼ teaspoon instant espresso powder
Set 3
1 tablespoon unsalted butter, cut into small cubes
Set 4
½ to ¾ cup grated, fresh coconut
Note: Honey does have its own flavor, especially if it’s from certain flowers like sage or wildflowers. The butter and the syrups enhance the shine and mouthfeel of the ganache.
Tools: 1-cup microwavable measuring pitcher, microwave oven, small whisk, medium bowl, rubber spatula, cutting board, knife, plastic wrap
DIRECTIONS
Chop the chocolate into very small pieces.
Use the pitcher to heat the heavy cream and corn syrup in the microwave just until it simmers.
Dissolve the espresso powder in the milk.
Pour the hot cream over the chopped chocolate and let stand for 2 minutes.
Use the small whisk to combine the ingredients until the chocolate is very smooth.
Add the small pieces of butter and stir to combine. Set aside, uncovered, until the ganache is cooled completely; the ganache will become quite firm.
Once the ganache is cooled and firm, wrap with plastic wrap just like you did for the macaron batter.
This hard filling may be piped immediately. It also keeps well in the fridge; however you have to set it out for an hour to come to room temperature or heat in microwave for 5 seconds—remove the metal tip first.
If you want to add coconut, pipe the ganache onto one macaron disc then sprinkle freshly grated coconut over the ganache. Gently press the second disc on the chocolate-and-coconut filling.
Note: Natural food stores sell unsweetened, dried coconut that you may use in place of the fresh coconut. Obviously, there will be a slight difference in texture and taste. Sometimes I mix the coconut directly into the chocolate so there is more coconut in each meringue. Occasionally I double batch the chocolate then use half for the coconut filling; I’ll save the other half for plain chocolate.
Effective March 2021, PaulaQ will begin replacing Canola and vegetable/seed oils in recipes with pure lard from Reverence Farm, coconut oil, and avocado oil.