SWEET PINEAPPLE JAM
 PRINT RECIPE
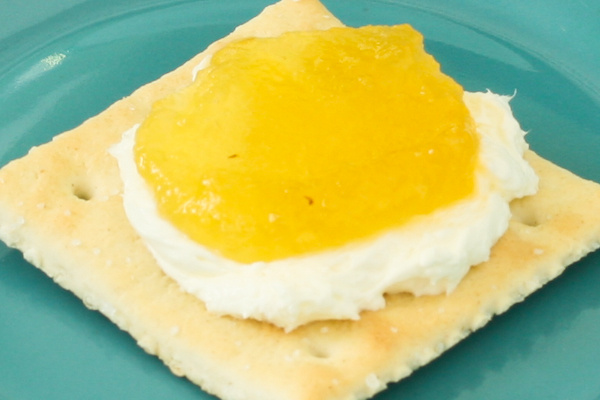
This is my favorite jam recipe! There is just something about this pineapple jam that is luscious, especially with cream cheese. It’s perfection in a jar. This makes 8, half-pint jars to give away and store the remaining 1 cup of jam in a plastic container or extra jar to keep in the fridge; this extra jar does not need to be sterilized.
When buying your pectin, be sure it is the regular, or classic, not the reduced-sugar pectin. I use RealFruit by Ball. If you are buying a water or pressure canning pot, read the box; flat or glass-top ranges need pots specifically made for them. Also, use a pot that leaves you enough room to remove the cover; if you get one too big, it may also be too high. I don’t remember the size of my pot; I think it is a 16-quart. It fits eight, half-pint jars.
The jars and rings may be reused to make more jam, however you will need to buy new lids.
I bought my canner at Walmart. The tools I use to make jam came from www.kitchenkrafts.com; such tools were selected individually as there was not set.
Watch the “how-to make strawberry jalapeno jam” video for a comprehensive demo on how to make jam. Substitute the pineapple jam recipe for the strawberry-jalapeno ingredients. Note there is a slight difference in one of the steps, as highlighted below.
INGREDIENTS
Set1
10 c. cubed, ripe pineapple (about the size of cubed pineapple in a can; yields approximately 6 ¼ cups pureed fruit)
¼ c. fresh lemon juice
½ c. water
3 oz. dry, low-sugar, powdered fruit pectin (this came to about 10 tablespoons of low-sugar powdered pectin in the plastic bottle)
Set 2
5 c. granulated sugar
Tools: canning pot with rack, jar lifter, lid lifter-bubble freer tool, jam funnel, large pot, small pot, immersion blender, two small plates, small spoon, large wooden spoon, 4 kitchen towels, plenty of napkins, heavy duty baking sheet, cooling rack, 4-cup measuring pitcher, trivet, 1-cup measuring cup
DIRECTIONS
PREPARE YOUR CANNING SUPPLIES
1. Wash jars with soap and water; rinse well. Place jars, open side up, on the rack in a large pot for boiling-water canning. Fill the pot with water to a level 1-inch above the top of the jars. Place the pot on the large burner, left side of the stove. Cover and bring to a boil for 5 minutes; start the 5-minute mark once you hear the water is at a rolling boil; this will take a while for the large amount of water to come to a boil. Jars can boil until you are done boiling the jam.
2. While waiting for the water to boil, wash lids and rings in soapy water; rinse well. Place the lids only in a small pot and cover with water to a level about 1-inch above the lids. Set on a small burner on your stove.
3. Dry the rings and set aside.
4. Wash and dry your jar lifter, colander, and magnetic lid lifter/jam stirrer.
5. Be sure you have several kitchen towels ready to set on your counter; you do not want to put hot jars of jam on a cold surface.
MAKE THE JAM…..while pot of jars is heating to a boil
1. Heat the pot of lids to a gentle simmer just before you begin mixing the jam ingredients. Keep the lids at a low simmer. Do not boil the lids or they may not seal properly.
2. Place the pineapple, lemon juice, and water in a large pot. Stir with a wooden spoon to mix.
3. Use the immersion blender to pulverize the fruit slightly.
4. Sprinkle the pectin over the mixture and stir well.
5. Use the immersion blender to completely pulverize the ingredients in the pot.
6. Keep a trivet on your counter where you will put the cooked jam.
7. Put the pot of jam on the burner, right side of the stove, at medium heat. Bring to a boil, stirring constantly. Once the jam boils, stir in the sugar.
8. When it comes back to a rolling boil, cook for 1 minute; a rolling boil is one in which the bubbles cannot be stirred away.
9. LEAVE THIS BURNER TURNED ON, but move the pot of jam to your counter, immediately to the right of the stove (if possible).
PUTTING IT ALL TOGETHER
1. Take the pot of lids off the stove too.
2. CAREFULLY move the boiling jars to the burner on the right; remember to keep this burner turn on, at medium heat.
3. Place the pot of lids on the left side of the stove, on medium-low heat.
4. CAREFULLY remove the lid of the pot with the jars; set the lid aside for now.
5. Use the jar lifter to pick up one jar, draining the water.
6. Place the sterile jar on the towel near your pot of jam then put the funnel on the jar.
7. Scoop 1 cup of jam into the funnel. Remove the funnel.
8. The jam should come up to between ¼- and 1/8-inch from the top of the jar. Run the bubble freer along the sides of the jam / jar, releasing any bubbles. Use a small spoon to fill jam back to ¼-inch to 1/8-inch from the top.
9. Use a slightly moist napkin to clean the top and sides of the jar’s rim, wiping off all traces of jam.
10. Take a lid from the pot using the lid lifter, shaking off some water. Place the lid on the rim.
11. Grab a ring then secure over the lid; tighten only with your fingers not your entire palm. Set the jar aside on a towel-lined, heavy-duty baking sheet.
12. Repeat with remaining jars.
13. Once done, use the jar lifter to place all jars back into the pot of hot water. Ensure there is space between jars and from the perimeter of the pot.
14. Cover the pot, turn the heat up to medium-high then wait for the water to come to a rolling boil; you should be able to hear this.
15. At a rolling boil, set the timer for 10 minutes.
16. Turn the heat off then carefully uncover the pot. Use a jar lifter to take one jar of jam out of the pot at a time; tip the jar slightly, emptying the water on the lid.
17. Set all jars aside overnight to cool completely.
ONCE COOLED COMPLETELY
1. Press down on the top, center of the lid of each jar. If you hear a clicking sound, the jar did not seal properly. Place unsealed jars in the fridge to eat first.
2. Unscrew the RING ONLY of each sealed jar. Gently, but thoroughly clean the rim and rings with a lightly damp cloth then DRY with a dry cloth; DO NOT REMOVE THE LID or you will break the seal.
3. Screw the rings back on each jar.
4. Label all sealed jars with flavor and date. Keep in a dark place for six to nine months for best results.
 Return to More Recipes
 Next Recipe