I had a craving for “meat” one day and ended up at Noodles & Company. I remembered they serve potstickers and it was just what the doctor ordered. These are so delicious and are much easier to make compared to lumpia. I started out with a recipe from “SAILIN” on allrecipes.com, but changed it quite a bit. I scoured the internet and found the best way to cook potstickers on a yelp.com forum by Fong "all night Fong" L.
Since the publication of this recipe and video, I have come up with a better way to crisp the bottom of the potstickers as noted further below.
FILLING
INGREDIENTS
Set 1
½ c. Nappa cabbage, finely chopped then measured
½ c. water chestnuts, finely chopped, measured then squeezed between two napkins to drain excess water
¼ c. carrots, finely chopped then measured
1/3 c. green onions, finely chopped then measured
2 tablespoons ginger, minced then measured
Set 2
2 lbs. ground pork
2 raw eggs, lightly beaten
Set 3
4 tsp. sesame oil
1 tablespoon garlic salt
2 tablespoons granulated sugar
1 tablespoon hoisin sauce
Tools: large bowl, heavy medium bowl, plastic wrap
DIRECTIONS
1. Place all ingredients in a large bowl and blend with one hand. Once combined, mix in a clockwise, “scrub-on” motion until the filling feels gummy. It should come together into a ball of meat.
2. Transfer the filling to the heavy, medium bowl. Cover the bowl with plastic wrap and place in fridge for two to four hours.
3. In the mean time, make the dipping sauce.
SAUCE
INGREDIENTS
Set 1
2/3 c. rice vinegar
½ c. soy sauce
1 ¼ c. water
Set 2
2 cloves of garlic, minced
2 tsp. ginger, minced then measured
1/3 c. green onions, minced then measured
2 tsp. hot pepper flakes, to your taste
3 to 4 tablespoons granulated sugar, to your taste
Set 3
1 tablespoon sesame oil
Tools: 1, 1-quart Mason jar with lid
DIRECTIONS
1. Place all of the ingredients into the jar except for the oil; stir.
2. Heat in microwave for three intervals of 20 seconds.
3. Remove from the microwave and stir until the sugar has dissolved.
4. Add the sesame oil and stir.
5. Set aside uncovered to cool.
ASSEMBLE RAW POTSTICKERS
It took me about 1.5 hours to wrap nearly 90 potstickers.
INGREDIENTS
Set 1
Pot sticker filling
About 80 to 90 gyoza or pot sticker wrappers, ROUND
1 egg
Tools: small bowl, napkins, sheet pans, wax paper, freezer bags, freezer container with lid, kid-size spoon
DIRECTIONS
1. Place the egg in a small bowl and lightly beat with a fork.
2. Unwrap the pot sticker or gyoza wrappers and set at your work station.
3. Take the filling out of the fridge. Place at your work station.
4. Line each sheet pan with wax paper.
5. Place 1 wrapper in your non-dominant hand.
6. Use the kid-size spoon to scoop about 1 ½ teaspoons of filling from the bowl. Put the filling in the center of the wrapper.
7. Dip two fingers of your dominant hand into the egg then brush the upward-facing, outer edges of the wrapper with egg.
8. Fold the wrapper around the filling taco-style; the edges should not stick together until you make the pleats.
9. Create pleats on the side of the wrapper facing you, making a crimped edge. Wipe fingers on napkins as necessary. Watch the video for a demonstration; it is very easy.
10. Lay the flat side of the pot sticker against the wax paper-lined sheet.
11. Repeat till you have finished the filling or the wrapper.
12. Freeze for several hours until the potstickers become hard. Gently put them in freezer bags.
13. Potstickers may be cooked fresh or frozen...no need to thaw.
COOK & EAT
In deciding how many potstickers you will cook, you must consider the size of the non-stick pan you have. This pan should also have a cover, or at least a cover that will fit around the inside rim of your pan. You need to cook enough potstickers to cover three-quarters of the bottom of your pan. If the base of your pan fills the large burner of your stove, you should get between 9 to 12 potstickers. They can be close together without touching. The amount of oil you will need is just enough to coat the bottom of the pan as you turn the pan, with a little bit extra sliding around. Before thawing, go ahead and arrange the frozen potstickers in the pan so you know exactly how many you can cook. Transfer them to a wax paper-lined plate and cover with plastic wrap; thaw overnight in the fridge.
I usually have two pans going if I am cooking potstickers for 2 to 3 people; I start the second pan once the water/oil in the first pan has boiled about 5 minutes. Once the potstickers are sizzling in oil and you have removed the pot cover, the oil does splatter onto the stove as if you were cooking pork chops.
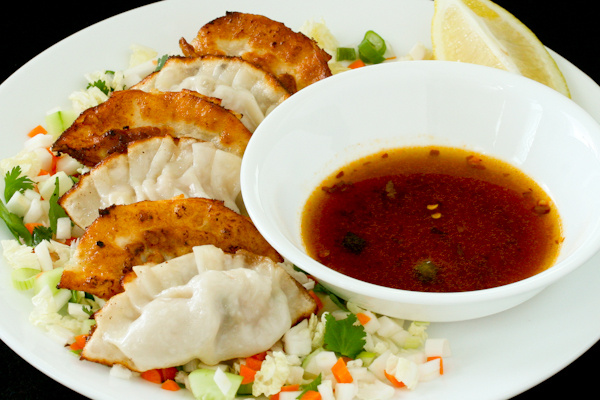
Cook potstickers as a meal, chopping veggies to go with it. The recipe below is enough for two people. Use the dipping sauce for your “salad dressing.”
INGREDIENTS
Set 1
18 to 24 potstickers (use 2 pans)
Set 2
1 ½ c. Nappa cabbage, chopped then measured
1/3 c. carrot, chopped then measured
1/3 c. green onions, chopped then measured
1/3 c. seeded cucumber, chopped then measured
¼ c. cilantro leaves, no chopping necessary
Set 3
1 large lemon
Set 4
½ c. of canola oil
3 c. room temperature water (tap water if it’s safe)
3 tablespoons distilled white vinegar
Set 4
1 c. pot sticker sauce
Tools: 4-cup measuring pitcher, small mixing bowl, 2 pans with covers, 2 tiny bowls for dipping sauce, 3 large plates, spatula, grease splatter guard, trivet
DIRECTIONS
1. Place 1 tiny bowl on each plate. Stir the sauce then spoon about a 1/2-cup into the tiny bowl; stir sauce every time you get a spoon of it. This ensures you don't grab too much oil.
2. Put the veggies from set 2 in the small mixing bowl. Toss to mix together. Sprinkle half of the salad on each plate, around the dipping bowl. Set aside. Cut the lemon lengthwise into fourths. Set aside.
3. Place the trivet and extra plate on the counter.
4. Mix the water and the vinegar together in a measuring pitcher.
5. Coat the bottom of a “cold” pan with ¼ cup of canola oil; do not pre-heat the pan.
6. Arrange the potstickers in the pan.
7. Pour enough water/vinegar mixture to cover the potstickers ONLY HALF WAY.
8. Cover the pan then turn the heat to medium high. Bring the mixture to a boil. Once boiling, crack the cover open just a bit; you should be able to see the mixture boiling through this crack. Boiling the potstickers in this mixture makes the top of the dough chewy.
9. REPEAT STEPS #5 - #8 IN THE OTHER PAN.
10. LISTEN CAREFULLY TO THEBOILING. You’ll boil the potstickers from about 7 to 15 minutes before you have to reduce the heat.
**NOTE 1: see below for a better way to crisp potstickers.**
11. Soon, you’ll hear the oil sizzling. Once you hear the sizzling instead of boiling, REDUCE THE HEAT TO MEDIUM.
12. Keep an eye on the bottom of the pan. You’ll notice the water start to really disappear. You may even see white “goo.” The sizzling will begin to intensify.
13. Remove the cover once the sizzling intensifies and there is just oil in the pan. Look at the bottom edges of the potstickers. You will notice they are beginning to brown. Use a spatula to lift the browning potstickers. Once all potstickers are browned along the edges, they should all be ready to be removed.
14. REPEAT #10 - # 14 FOR THE OTHER PAN.
15. Squeeze lemon over all of the potstickers; THIS IS A MUST…it marries all the flavors perfectly!
NOTE 1: While the potstickers are simmering in the water, vinegar, and oil mixture, sprinkle a generous layer of rice flour on a large platter. The platter should be big enough to arrange your potstickers in a single layer. Once you hear that the liquid mixture is sounding like thick, bubbly syrup (instead of sizzling oil), remove the potstickers (should not be sticking to pan at this point). Place them on the rice flour, bottom side down, coating only the bottom. Clean your pan. Add just enough oil to cover the bottom, and heat on medium for about two minutes. Carefully arrange the rice flour-coated potstickers in the oil and cook till nicely browned on the bottom.
NOTE 2: Potstickers may be cooked directly out of the freezer. There is just a slightly noticeable difference in texture. Leftover, cooked potstickers should be kept in the fridge. To reheat, pour boiling water over potstickers and cover; leave covered for 5 minutes. In the mean time, pour about ¼ cup of oil into a “cold” pan. Drain the potstickers and arrange in the oil-covered pan; careful as potstickers will be hot. Heat potstickers on medium heat. Once you begin to hear the sizzle of the oil, fry for 5 minutes. They will still be good though freshly cooked is better.
Effective March 2021, PaulaQ will begin replacing Canola and vegetable/seed oils in recipes with pure lard from Reverence Farm, coconut oil, and avocado oil.