My husband loves the burritos at Alberto's in San Diego, California. On a recent trip to that side of the world, my kids enjoyed the breakfast burrito from Alberto's. I’ve never liked the flour tortillas from the store so those were out of the question. Thus, I had motivation to make homemade Mexican flour tortillas.
I always start my recipe searches on allrecipes.com. This recipe was inspired by J.M.’s recipe on that website. I incorporated some of the suggestions and drastically reduced the salt. If you’ve handled dough before, you’ll love this dough. It is the most luxurious, soft and supple dough you’ll ever work with. If I remember correctly, when I made the dough with butter Crisco and white Crisco, it was super duper soft. However, I had to use bacon fat because I’ve read that it is more traditional to use that type of fat; I also think it is more flavorful!
I researched a bit the recipes for Mexican flour tortillas since I really had no clue how to make them. The key to this dough remaining soft and pliable the next day is the boiling water, the combination of fats, the ratio of fat to flour, a small amount of kneading and the long rest period. Tortilla dough is similar to siopao and tityas dough; if you knead it too much, the end product will be soft initially then later become hard.
I roll my dough on the counter space near the stove. There is less distance to travel to my skillet, thus less risk of tearing the dough. I still need to practice my tortilla-rolling technique, but I promise you will love the taste and texture of this recipe.
from a fan: "Hi Paula, just wanted to thank you for the Mexican tortilla recipe. I made them this morning, breakfast burrito, and it was a hit!!!! Thanks again!" L.F.
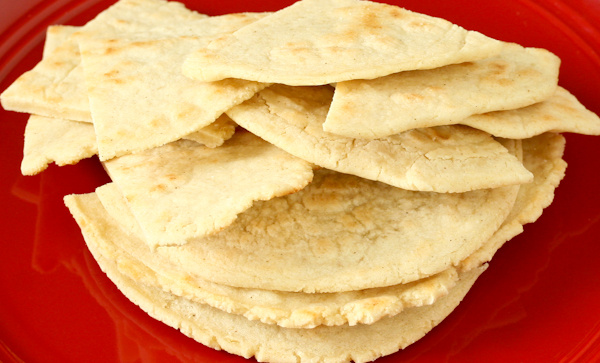
The recipe makes 12, 8-inchish tortillas.
INGREDIENTS
Set 1
3 c. all-purpose flour
¼ tsp. + 1/8 tsp. baking powder
¾ tsp. salt
Set 2
4 tbsp. butter flavored Crisco
2 tbsp. solidified bacon grease, or lard, or white Crisco
**UPDATE: You may replace the Crisco with all lard/bacon drippings for extreme tortilla lusciousness.**
Set 3
2 c. boiling water
Tools: large bowl, fork, 2-cup measuring pitcher, spatula, medium container with a cover, kitchen towel, rolling pin that is even all the way across, cast iron skillet or comal, terra cotta tortilla warmer with cover
DIRECTIONS
1. Mix all of dry ingredients in a large bowl.
2. Add the butter Crisco and the bacon fat. Blend with your hand until the mixture resembles coarse crumbs.
3. Make a well in the middle of the bowl.
4. Heat the water in the microwave until it boils.
5. Pour about 1 cup of the boiling water into the well. Blend together with a large fork.
6. Add a little bit more water at a time, using the fork, until you can form somewhat a ball of dough; by this time, the dough should be cool enough to use your hand.
7. Use one hand to form a non-sticky ball. Knead a few times in the bowl.
8. Transfer dough onto a lightly floured surface. Gently knead the dough into a disc then fold the disc in half and shape the dough into a log.
9. Divide the log in half then divide each log into three equal pieces. Divide each small piece in half again.
10. Shape each piece of dough into somewhat of a ball.
11. Put all of the balls into the container.
12. Drench the kitchen towel in water then wring it out.
13. Drape the moistened towel over the container then fit the cover over the towel; you don’t have to snap the cover closed. DO NOT USE a moist paper towel; it will dry out and cause the dough to become a bit dry.
14. Set the dough aside for one hour.
15. Preheat your skillet to just under medium heat. As you cook the tortillas, you may have to reduce the heat to between medium-low and medium.
16. Lightly dust your work surface with flour. Working with one ball of dough at a time, use a rolling pin to roll the dough out into a circle. The dough should be quite thin such that you could almost see your work surface through it.
17. Use your fingers to pick the dough up and transfer it to the skillet. Cook the tortilla till it is nicely browned on the bottom, about 45 seconds; time depends on your stove. You will see bubbles form in the tortilla; don’t pop them. Do not cook tortillas for longer than 1 minute on each side.
18. Flip the tortilla to the other side and cook till browned; the second side will be ready more quickly than the first side, about 30 seconds.
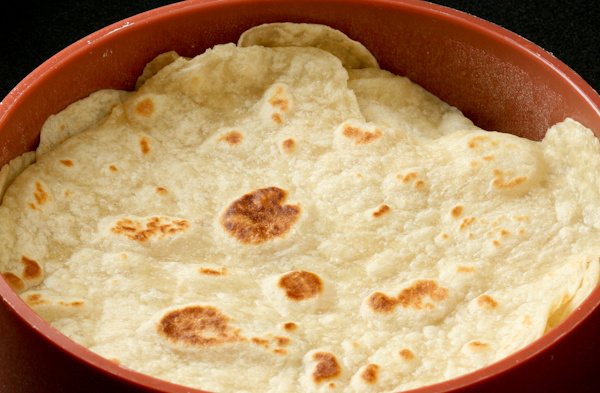
19. Place finished tortilla in a tortilla warmer. Cook all tortillas and keep in the warmer until ready for use.
NOTE:I keep leftover tortillas in the covered warmer till the next day; 12 pieces don’t last more than two meals for our family. The tortillas are still soft and pliable the day after, but I generally reheat one at a time on a plate in the microwave; it’s even more delicious when hot! If you need to reheat the whole stack of 12 tortillas, remove the tortillas from the warmer. Place a moist paper towel in the warmer then stack the tortillas on the paper towel. Reheat this construction in the microwave. Remove from microwave and cover with the warmer’s cover till ready to use.
The breakfast burrito at Alberto's had very cheesy scrambled eggs and bacon. After I cook the bacon, I pour the oil into a glass jar. Once it cools and solidifies, I keep it in my fridge. When I make tortillas, I simply measure 2 tablespoons from the jar. I think one package of bacon yields about 3 tablespoons of fat, maybe 4. This fat begins to melt once you take it out of the fridge. Mix all your dry ingredients and portion the Crisco then go for the bacon grease.
My tortillas do not look as white as other versions. The color is due to the yellow of butter Crisco and the brown of the bacon grease.
Effective March 2021, PaulaQ will begin replacing Canola and vegetable/seed oils in recipes with pure lard from Reverence Farm, coconut oil, and avocado oil.